Beverage
These mocha iced coffee cubes are the perfect way to keep your iced coffee bold, while adding a fun flavor twist. They’re gluten free, dairy free, and a great easy to make treat.
Oh how I love me some iced coffee. I’m sure this comes as a shock to all since I’ve never, ever mentioned it. I’ve surely never posted a picture of me drinking iced coffee on Instagram….
Ok, #busted.
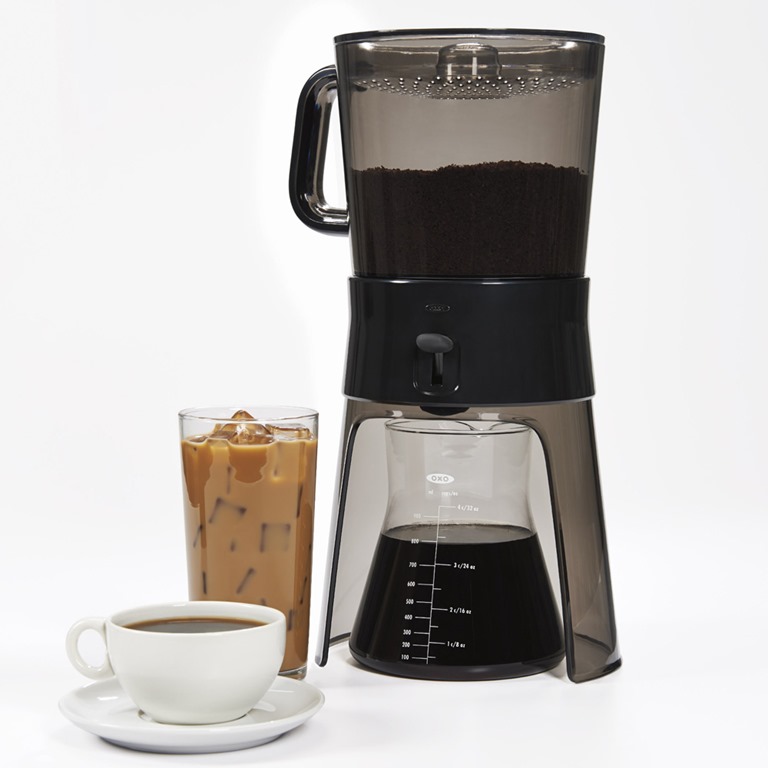
Though I get my fair share of iced coffee on the go, I love making it at home too. I even perfected my own homemade cold-brew method before it was trendy and cool. Luckily I’ve discovered something way way easier than a coffee filter precariously balanced on top of a strainer on top of a pitcher…and actual cold brew set.

Iced Coffee Cubes
But the best part of making iced coffee at home is that I can load my cup up with iced coffee cubes before filling it with cold brew, meaning if I don’t get to chug it down in one gulp, it doesn’t end up in a watered-down mess.

[Tweet “Try these mocha cubes to keep your next iced coffee bold & fresh!”]
Here’s a fun twist on plain-old coffee ice cubes, which give your iced coffee just a hint of mocha character without being overwhelming.

Simply combine leftover coffee or some cold-brew, Almond Breeze Almondmilk chocolate, and a dash of cinnamon. Pour into ice cube trays and freeze so your iced coffee cubes are ready whenever your next cup is calling. Which is always.


Or you know, just eat them plain, like some unnamed three year old. 


This “Easy as Breeze” post was originally sponsored by Almond Breeze Almondmilk.
Dessert, Recipe
{Should I admit that I really, really wanted to title this post “Every Day I’m Trufflin’”…yeah, probably not…}
While I’m not your typical chocolate-obsessed girl, there is something about Valentine’s day that screams chocolate.

Ok, truth? I just wanted something to put sprinkles on.

I think truffles fit the bill nicely, don’t you?

Delicious, sweet, spicy balls of sprinkles.


Yes, I said spicy.
Everything sweet needs a little kick, dontcha think? Don’t worry, it’s not an in-your-face kinda thing. It just sneaks up on you at the end as you’re licking your lips clean of that last taste of truffley-goodness.

I don’t think these really need anymore introduction. Except maybe to tell you that these chocolate truffles are dairy free and vegan {depending on your sprinkles}.


by with a Side of Sneakers
- 1 cup chocolate {dairy-free: I love Enjoy Life brand}
- 1 Tbsp coconut oil
- 1/2 cup coconut milk {full-fat, canned}
- 1/4 tsp vanilla
- 1/2 tsp cinnamon
- 1/4 tsp cayenne pepper
- 1/8 tsp chili powder
- pinch of sea salt
- sprinkles
Combine chocolate chips and coconut oil in heat-proof bowl. Melt in microwave or in double boiler. Stir until smooth.
Whisk in coconut milk and spices. {If lumps form, pop it back in the microwave for a few seconds.}
Refrigerate for ~30 minutes or until mixture starts to solidify {but isn’t hard}.
Use a tablespoon to scoop chocolate into balls. Roll between your palms to form smooth balls, then roll in sprinkles {or other toppings such as crushed nuts or powdered sugar}. Be sure your hands are cold so you don’t melt the chocolate- I squeezed an ice cube every few balls to keep things cold.
Refrigerate if not immediately devoured.
Powered by
Note: be sure to stir well. I was a little truffle-happy and jumped the gun. My taste-tester {the husband} didn’t know they had a hidden kick until his last bite- when they really kicked. 
So go grab some festively themed red, white, and pink sprinkles and get trufflin’.

How are you celebrating Valentine’s Day? Or are you in the “fabricated holiday” camp?
Breakfast, Recipe
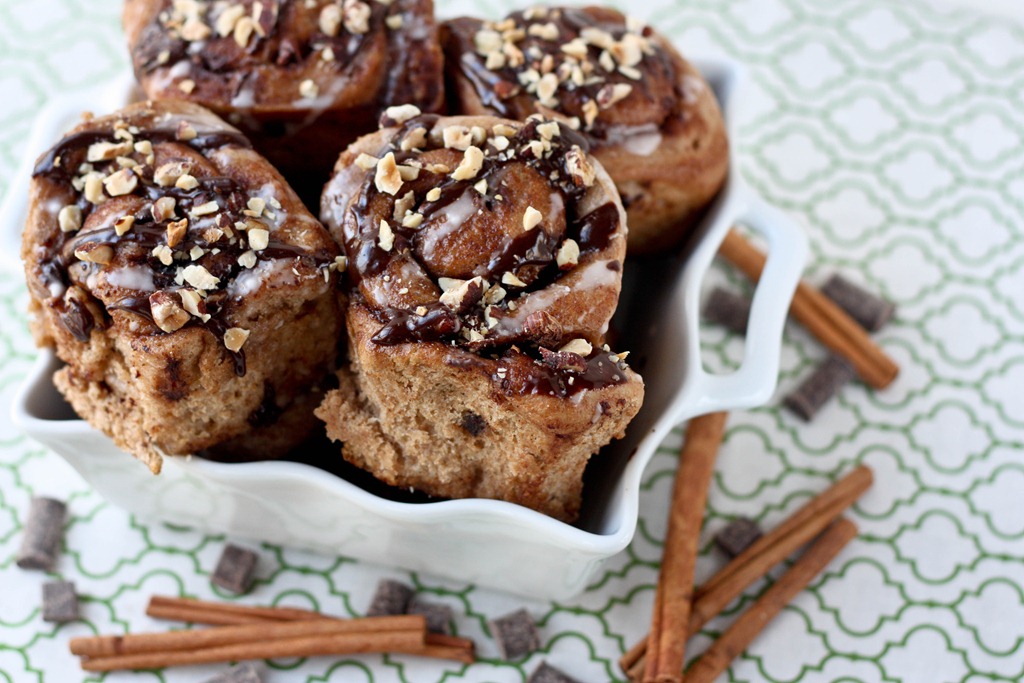
There are trends for everything; fashion, colors, music, and even flavors. This past year’s dominating flavors? Cake batter, bacon, and Nutella. Just take a quick glance at Pinterest if you don’t believe me. It’s the Nutella one I’m interested in- dark chocolate-y, hazelnut gooeyness. Paired with my favorite baked breakfast of all time- cinnamon rolls- it’s sure to be a winner.


I tweaked my favorite whole wheat cinnamon roll recipe to make it dairy free, egg free, and soy free, then added the divine flavor combo of dark chocolate and toasted hazelnut. These dairy free cinnamon rolls are stuffed with not only rich brown sugar cinnamon filling, but every bite is loaded with melted dark chocolate. The toasted hazelnuts enhance the flavor of the chocolate and provide a surprise crunch with every mouthful. In case a dough filled with both chocolate and hazelnut wasn’t enough, I topped the cinnamon rolls with a chocolate ganache, hazelnut infused icing, and toasted chopped hazelnuts.

I keep hazelnut syrup on hand for my morning coffee addiction, but feel free to sub vanilla if you don’t have any. The hazelnut syrup gives the flavor an extra kick, but you won’t be missing out if you need to forego it.

by with a Side of Sneakers
Dough
- 1 c Silk Pure Almond Unsweetened Original
- 2 1/4 tsp instant yeast {or 1 packet}
- 2 1/2 c whole wheat or spelt flour {plus ¼ to ½ cup extra for kneading}
- 2 t baking powder
- 1/4 c sugar
- 1/4 t salt
- 1 t cinnamon
- ¼ cup unsweetened applesauce
- ½ cup dark chocolate (vegan/dairy free) chips
- Optional: 1 Tbsp hazelnut syrup
Filling
- 3 Tbsp vegan/dairy free margarine/butter
- 1/4 c brown sugar
- 1 Tbsp cinnamon
- 1/4 cup toasted hazelnuts, chopped
Icing
- ½ c powdered sugar
- 1/2 Tbsp almond milk
- 1/4 tsp hazelnut syrup or vanilla
Chocolate
- ¼ cup dark chocolate chips
- 1 Tbsp vegan/dairy free margarine/butter

Heat almond milk for about 40 seconds in the microwave- you want it warm, but not scalding hot. Stir in yeast and set aside.
Mix flour, baking powder, sugar, salt, cinnamon, applesauce, and hazelnut syrup, if using.
Add in almond milk and yeast mixture. Stir or mix in electric mixture until dough comes together. It’s ok if it’s still a little bit sticky at this point.
Fold in chocolate chips.
Spread a clean, flat surface with flour. Adding flour as necessary to prevent sticking, knead dough until it forms a nice smooth & slightly elastic ball.
Using a rolling pin, spread the dough into a rectangle. I usually end up with dough about 1/2 inch thick.
Melt margarine or butter and stir in brown sugar and cinnamon.
Spread the cinnamon sugar mixture liberally over the rolled out dough. Top with hazelnuts.
Starting from the skinny end of the dough rectangle, roll the dough tightly towards the other end.
Slice the roll into ~1-1 1/2 inch strips, discarding the ends if necessary.
Grease a 9×9 baking dish and line rolls in pan. Cover with plastic wrap or foil and refrigerate overnight.
When you’re ready to bake your cinnamon rolls, preheat the oven to 350 degrees and let the rolls come to room temperature.
Bake cinnamon buns for 20-25 minutes.
While cinnamon rolls cool, prepare icing and chocolate mixtures. To prepare icing, combine powdered sugar, almond milk, and hazelnut or vanilla. Stir until smooth. To prepare chocolate, melt margarine or butter, then stir in chocolate chips. Heat in microwave a few seconds at a time until chocolate melts enough to blend smoothly.
Pour icing and chocolate over cinnamon rolls.
Top with toasted hazelnuts.
Powered by
These dairy free nutella cinnamon rolls may sound absolutely sinful, but they’re not as decadent as they sound. Each gigantic cinnamon roll provides 278 calories, 5.5 grams of fiber, and 7 g of protein- that’s a 10 calorie-per-bun savings over skim milk! When you eat the whole pan like I may or may not have done, that savings sure adds up.

This recipe is part of a campaign for Silk through FitFluential. All my own words, thoughts, and opinions of course!
Dessert, Recipe
Can’t eat dairy? No problem. Enjoy this dairy free twix bar recipe instead. (Psst…it’s way easier than it looks.)
Jump to Recipe
With Halloween right around the corner all I can think about is candy. It’s everywhere. The end caps at the grocery store. The opening display at Target. The checkout line. Blogs. Pinterest. Facebook. EVERYWHERE. And there’s not one piece of it I can eat. {Ok that’s a totally lie- I may or may not have eaten an entire bag of candy corn by myself in 2 days; HFCS and all.}
What I really mean is that I can’t eat my favorites: Twix Bars & Snickers. Now, I’m not a chocolate fan, but when you use it to wrap up caramel-y deliciousness, I’m all in.
The husband cringes every Halloween because I’m that neighbor. The one that gives out pretzels. But I’m not a total party pooper- I compromise and hand out fun size candy bars along with the pretzels. If I’m being honest, the candy is really so the husband and I can eat the leftovers, not because I think the kids need it. And yes, I by the variety pack and then hide all my favorites on the bottom of the bowl in hopes that those will be what’s left at the end of the night. Don’t lie, you do it too.
{If you’re trying to be healthy and still want to give out candy, try buying something you don’t like. We did that last year and there are still remnants of Jolly Rancher chews sitting around in random corners.}
If you can’t tell, I’m totally in the camp that it’s ok to partake in the Halloween treats and not just the tricks, as long as you’re smart about it. So what’s a girl to do when she can’t eat her beloved Twix and they’re taunting her everywhere she looks?

Dig into the old favorite recipe archive and bring back an oldie but a goody. Technically it’s millionaire’s shortbread, but how is that really any different than a Twix bar? {Except for the sea salt on top which only makes it that much better.}

You can certainly use a dairy-free, soy-free spread like Earth Balance {the red container}, but this time around I went with coconut oil. Holy deliciousness. Makes a bit of a mess in the warmer non-fall weather surge we’re having, but they taste great chilled right out of the fridge or freezer.

It’s vegan. Dairy free. Soy free. Woohoooo! Don’t go fooling yourself, it’s still full of sugar- I’m not a miracle worker.
Dairy Free Twix Recipe
Can't eat dairy? No problem. Enjoy this dairy free twix bar recipe instead. (Psst...it's way easier than it looks.)
For the Cookie
-
1/2
cup
non-dairy butter
cold
-
2
cups
all-purpose flour
-
1/4
cup
packed brown sugar
-
1/4
tsp
sea salt
For the Caramel
-
1/2
cup
granulated sugar
-
1/2
cup
non dairy creamer {I used So Delicious coconut creamer}
-
1/2
cup
golden syrup {I used Lyle’s}
-
1
Tbsp
non dairy butter
-
1/2
Tbsp
vanilla extract
For the Chocolate Coating
-
1 1/2
cups
dark chocolate chips {non-dairy
such as Enjoy Life}
-
1
Tbsp
coconut oil
-
1
Tbsp
high quality sea salt {fleur de sel}
For the Cookie
-
Put the non-dairy butter, flour, brown sugar, and salt for the cookie in food processor and chop until blended.
-
Press mixture into 11x7 or 9x9 baking dish lined with foil & greased, packing firmly. Bake at 350 degrees for 20 minutes or until lightly browned.
-
Let cool thoroughly before moving on. {Can place in fridge.}
For the Caramel
-
In a large saucepan over medium heat, mix granulated sugar, creamer, and golden syrup. Stir consistently until sugar dissolves. If you have a thermometer, use it.
-
When sugar dissolves, stir in butter. Continue stirring until mixture boils; hands off- don’t touch now!
-
Let mixture boil until it reaches 245 degrees.
-
Stir in vanilla, then pour on top of shortbread and spread evenly. Let cool completely.
For the Chocolate Coating
-
Melt chocolate chips and coconut oil over double boiler, stirring until smooth.
-
Poor over caramel layer and spread evenly.
-
Before chocolate hardens, sprinkle generously with fleur de sel.
-
Let cool. May need to refrigerate or even freeze.
-
Slice into bite sized pieces.
-
To make more Twix-like, slice cookie & caramel layer into long strips before drizzling with chocolate and let chocolate spill over the sides. Omit salt. Mmmm.

What’s your favorite Halloween candy? Have you tried making a homemade version of you favorite candy bar before?
Guest Posts
Jen was kind enough to whip up this perfect Easter treat for us, and then I went and didn’t post it in time for Easter. #fail. But there’s no reason you have to wait for another Easter to roll around- this is not only the perfect spring dessert, it’s the perfect anytime dessert. I’m going to have to start requiring samples to go along with guest posts. 

here we go.
it’s easter.
loads of displays of chocolate eggs are zapping our system.
the anticipation for the easter bunny’s arrival is sending some kids into a frenzy.
and rightly so on their behalf.
but…is opening a brightly coloured foil wrapped chocolate egg as a grown-up as exciting as it was when you were five?
i’m guessing not.
the one thing i have felt in my life is a sort of roller coaster of development. you are born, embrace all that is child-like, hit the tweens and puberty and are forced out of all that and into more grown up adventures. then you are in your twenties or thirties, and are of course loving that and all it brings, and eventually you get knocked up and have to change your life right back to what you have grown out of. all of the precious time you took for adult development to shape you into this cool hip person now has to give way for baby einstein, peek-a-boo and nursery rhymes. and everything you do, eat and entertain yourself with has all the appeal to the 3 year old sitting in your lap – not so much yourself.
or you don’t have kids all together and feel a little left out when it does come to the easter egg hunts and gorging yourself on the required chocolate of the season.
so when do you get to have it all? the kids, the development, the holidays?
and why can’t it be sophisticated, refined and for lack of a better word – grown up?
that’s why am i bringing to you this….perfectly designed for the grown up table.
espresso chocolate ganache tart.
say it with me….espresso chocolate ganache tart.
think about it. savour it. now go and make it.
perfect for easter dinner.
not too pretentious for having with girlfriends.
classy enough for a dinner party when entertaining the boss or clients.
place a bowl of foil eggs on the kids table.
place this on yours.
and don’t forget the bubbly!! caps it off perfectly.

espresso chocolate ganache tart.
makes one 9 – 10 inch tart. i have on occasion stretched it out to accommodate a 12 inch one.
sweet shortcrust pastry dough.
the original of this comes from my grandmother. it’s the classic one – i didn’t re-invent the wheel here. but a trick i have picked up is adding powdered sugar to the crust rather than refined sugar. i feel it incorporates better and adds a smooth finish to the pastry. you could also add a touch of citrus zest if you like. i personally like a sweet dough – if that’s not your deal, just leave out the powdered sugar. do not adjust the other ingredients.
2 cups all-purpose flour, plus extra for rolling out
1/2 teaspoon of fine salt
9 tablespoons of unsalted butter, chilled and diced
2 large egg yolks
2 tablespoons of ice water {i actually use about 4 but start with 2}
1) sift the flour, salt and powdered sugar together {if using} into a bowl and then rub in the butter.
2) mix together the egg yolks and ice water. add to the flour, mixing as you go. the dough must be a little wet to hold together. if you feel your dough is still a little dry add more water, a tablespoon at a time, till desired consistency is achieved.
3) invert dough out on to a lightly floured surface and gently knead together until smooth. form dough into a ball. flatten dough slightly and wrap in plastic wrap and chill for at least 30 minutes before rolling out.
rolling out and blind baking your crust.
pre-heat your oven to 400 degrees. roll out your dough, on a lightly floured surface, as thinly as possible – about 1/8 inch thick – to line the dish you are using. to line the tart pan simply roll your dough around your rolling pin {to avoid stretching out your dough} and roll it out over the surface of your pan. using an extra piece of dough wrapped in plastic, push down your dough into the edges & sides of your pan. once your are happy with this roll your pin over the top of the pan to cut off the excess dough {save this dough! or transfer right away to little tart shells or cut out in strips, twist, egg wash and sprinkle with cinnamon sugar and bake!}. prick the dough all over with a fork and freeze/chill for about 15 minutes. {also if you have the freezer space a fun thing to do is prepare a lot of these, in different sizes and shapes, to have on hand in the freezer at a moments notice!}. line chilled dough with parchment paper and your "baking beans" {store bought pie weights or dry beans – i use nave beans – that you have specifically for this task.}. set on a baking sheet and blind bake in the center of the oven for 10 to 12 minutes. remove the parchment and the beans and bake for another 5 to 7 minutes. whne this is all done coast the crust with a egg ash {one beaten egg}, you can do this when hot or cold. then return the crust for one final time to the oven for 5 – 10 minutes to get it all shiny and golden brown. perfect. remove from oven and let cool completely.
espresso chocolate ganache.
the secret to this is the instant espresso powder. yes, it’s a powder. yes, it’s instant. yes, you can buy it in the grocery store. no, it’s not beans or brewed espresso. i’m sure you could possible seep crushed espresso beans in the cream while heating but not grounds – you would have to strain the cream before adding to the chocolate and the ground might sneak through the strainer. you could also swap out the espresso for a liqueur but that’s another recipe for another day!
12 ounces good quality 70% cocoa dark chocolate {you could do half dark and half semi-sweet but you want to have at least 6 ounces of dark chocolate in there.}
1 1/4 cup of heavy cream
2 tablespoons of instant espresso powder
chop up your chocolate and place in a heat proof bowl, sprinkle with espresso powder and set aside. in a small to medium saucepan heat your cream on low till just boiling, stirring constantly so it does not scald. pour hot cream over chocolate and espresso powder. starting in the center stir chocolate mixture until smooth and creamy. keep stirring till all the lumps are out. pour into prepared crust, smooth the top out with an off-set spatula and allow to set for 2 hours at room temperature or one hour in the fridge. serve with a dusting of powdered sugar or with sweet vanilla whip cream.

thanks heather for letting me hang out today!!
Jen Gronick is the voice behind the blog, Experience the Wonderful. When she’s not creating recipes and good food to eat, displaying her diy projects and expressing her voice, she is busy being the mother of two and the wife to her own mr. incredible.
After re-locating from the westcoast and putting down roots in the french-canadian countryside, jen and her family are still trying to discover it all and “experience their wonderful” every chance they get.






%20YUM! "Pin It")


