bike maintenance
…I didn’t learn in kindergarten.
I’m currently on my bike right now (if all is going well), with just a few hours left to go of 24 Hours of Booty!
I’m not a biker by nature. I was always a runner- until the day I couldn’t run any more. Though I didn’t really want to, I got on my bike for the first time in years and found a new way to get around. While it’ll never be the same as running for me, I’m glad I’ve found an alternative to keep me moving.

I didn’t know much about biking (I mean, I believed the bike shop when they told me a hybrid bike was great for racing…bahhhaha), so I’ve learned a lot along the way.
I thought I’d leave you with a collection of some of my best biking knowledge, whether you race, ride for fun, or are just thinking about picking up a bike for the first time in years:
How to Change a Bike Tire (or a more “correct” version of how to change a tire)
Bike Parts & Basic Maintenance Seriously, bikes have some oddly named parts. I couldn’t tell a sprocket from a derailleur to a cassette and was too embarrassed to ask…
How to Adjust Your Bike so it fits you. I knew exactly how to set up a spin bike at the gym, but I was clueless as how to go about adjusting a “real” bike.
and finally….
Using Clipless Bike Pedals I’m already in love with mine. Let’s hope I don’t have any bike-tastrophes this weekend.


Any tips to add? Any funny bike stories? Don’t be shy 😉
I used to be scared of bikes because:
a) I was riding on the bike of my dad’s bike when I was super little & he crashed- I crashed with the bike and my head bounced on a sewer grate like a ping pong ball. (Wear your helmet!!)
b) I was biking up a hill on a crowded road when I was maybe 10 or so, and the car behind me got annoyed with going slowly and drove into me.
But I’m over it 😉
And don’t forget to enter my hydration giveaway! Ends tonight!
bike maintenance
Last night I went to bike class #2, intermediate mechanics (yes, different shop than the bike kidnappers).
Even if you’re never going to work on your own bike, it doesn’t hurt to have a vague idea how things work. Kind of like your car- you may not change the oil yourself, but you do know that your car uses oil, it needs to be changed, and it’s under the hood.
The most useful thing we talked about last night was probably adjusting the derailleur. (I’m biased- I think this is important because it’s one of the things that contributed to my chain falling off during the triathlon.)
Let’s go over some parts, shall we?

A sprocket is one of the round, spiked-looking disks the chain rests on. Each sprocket is a different size- the smaller the sprocket, the higher the gear. The cassette is the whole series of sprockets together.
The derailleur is what knocks the chain from sprocket to sprocket when you change gears.
A silly but useful analogy is that it’s like derailing a train- it knocks the chain off the “track”.
There are front & rear sets of all of these things. (Cassette, derailleur, etc.)

These are the adjustment screws- they let you adjust the derailleur from side to side so the chain lines up with the sprockets correctly.

The “H” is referring to the high gear, which is the smallest sprocket. The “L” is talking about the lowest gear, or biggest sprocket.
[Got that? High gear = small sprocket and vice versa. High gear = harder to pedal. Still confuses me sometimes.]
Adjusting these screws essentially sets limits for where the derailleur is lined up in the highest & lowest of gears.
How do you know where it should go? If you stand at the back of your bike and look down the length of the derailleur, the chain should be centered in the middle. (On the same plane.)

Those are the screws to adjust the front derailleur.
So the screws set the alignment for the highest & lowest gears- what about all the gears in the middle? Then you need to adjust the cable.
But we’re confused enough now. We’ll stop there. 😉
Do check occasionally and make sure your derailleur isn’t bent– it can lead to disastrous events: If the derailleur gets to close to the wheels, it can hit the spokes and rip the whole thing off- if you’re lucky. If you’re not lucky- it’ll bend your entire bike frame & then you’re screwed. So it’s worth checking, ok?! 😉
Chances are you don’t need to know this, but do get familiar with changing a tire. I promise it’s not hard, and you never know when you might need to do it!
Bike update: the person I need to talk to won’t be back til Saturday now. Humpph. Guess who goes out of town Saturday? Yeah, me. 🙁
bike maintenance, Training
First up: Changing a bike tire
This is probably the most important thing to know how to do if you ride a bike, whether for fun, fitness, or racing. You never know when a flat could happen!
I personally like my own version of changing a tire, but here’s what was covered at last night’s bike maintenance class. I found I was doing a few things wrong, but hey, if it works, it works!
(PS If you’re a picture person, go read this tutorial instead.)
How to Change a Bike Tire
1. Elevate bike– use bike stand, tree limb, friend. (You can turn it upside down, but that can cause the chain to fall in a weird manner & make getting it back on more difficult. I’m going to use that as my excuse;))

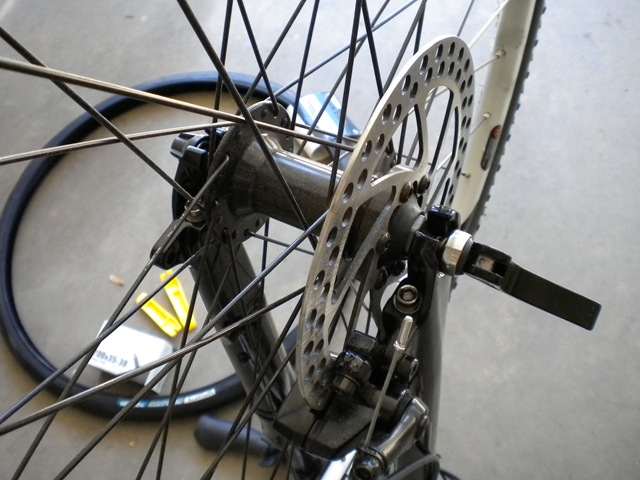
2. Release brake quick release. (Unless you have disc brakes- then you won’t have one/need to)

3. Open quick release and loosen skewer nut.

4. Remove wheel from bike.
5. Release air
6. Use a pair of tire levers to help you get one side of the tire off. Use one lever to pull a piece of the tire out from under the rim, then attach it to a spoke. Use a 2nd lever and starting where the tire is already released, run the lever around the edge of the tire until one side is completely free.
7. Pull out tube.
8. Find out what caused the flat & fix it!
9. Get a new tube. Some people like to put a little air in it, some don’t.
10. Put the air nozzle through the hole in the rim, then slide tube into tire.
11. Push free edge of tire back into rim. Try not to use any tools to get the tire back on, as it could puncture the tube. (Tip: Face the edge of the tire you’re trying to get back in away from you. Using the palm of your hand, pull towards you in a rolling motion on the tire.)
12. Make sure tube is not sticking out or caught anywhere.
13. Fill with air.

14. Put tire back on. Best to have quick release on left side of the bike, pointing back or up.
Random tidbits:
–90% of flats occur in the back tire. (Bikers tend to steer around objects, but only with the front wheel, not the back. Plus there’s more weight back there!)
-The #1 cause of flat tires is inadequate air pressure—top off your tires at least once/month.
Cross training
Mission accomplished: I changed my first bike tire!! There’s probably a better way to do this (or at least explain it), but here’s how I did it.
– You’ll need the following: tire, tube, tire levers, air pump (If you’re just changing the tube you don’t need a new tire)

1. Remove wheel from bike. (I put my bike upside down to make it easier)
– You’ll either need to loosen bolts or use quick release lever, depending on your bike
– Carefully remove chain from gears when removing back wheel. Watch your fingers!


2. Release air from tube. I just used the valve cap to push down the center of the valve, but I’m sure there’s probably a more technically correct way to do this.

3. Use tire levers to help remove tire from rim. Wedge first lever under tire to pop out edge- then attach to wheel spoke. Place a second tire lever under the part that’s pulled out from the rim, and run it along the edge of the entire tire. You should then be able to remove the tire from the rim.


4. Gently pull tube out of tire. Patch or replace with new tube if needed.

5. Put tire back on wheel by putting one edge of tire back on rim, then use fingers or tire levers to push second edge back in place. (Honestly, this was the hardest part for me)

6. Re-inflate tube slowly, watching that the tube isn’t being pinched under the edge of the tire. Use a pump that will actually work, not one like this.

7. Put wheel back on bike.

Look how smooth that tire is!!
8. Ride like the wind.
I only have one new tire so far, so I put it on the back wheel so I could use it with my indoor trainer! The original tire was so knobby that it wouldn’t work on the trainer- rubber would go flying and it was super, super, super loud.
I’m so excited to finally be able to use it! (It’s still pretty loud but that’s ok.)

One step closer to a tri-ready bike! Next up- another tire. Then pedals!
I went to a bike maintenance clinic last year after I realized too late that I didn’t know anything about fixing a bike or how anything on a bike worked. I took notes but of course I lost them. I’m keeping an eye out for another clinic so I can get a refresher. I highly recommend learning basic bike maintenance- you never know when you’ll need to use it. (Like in the middle of a triathlon).
Any tire-changing tips?